Shader Basics
intro
in my shader tutorials, i talk about a lot of different methods, so i wanted to make a page to use as reference and to try and break them down as simply as i can! all of these can be mixed and matched in different ways, and they very frequently are
since i want this page to be accessible to people from any skill level, even complete beginners, every now and then you'll see underlined text, which you can hover over to see notes/clarifications for certain terms, or certain generalizations i might be making for simplicity's sake. dont click on them just hover. it makes the hover text go away for some reason. i dontknow how html works. help
if something is a bit too confusing, broken, or i made a mistake somewhere, please dont hesitate to contact me on my bluesky!! that's about it i think!
table of contents
about vectors
in shaders, you can think of a vector as a way to describe a direction
if you are incredibly new to shaders and need some help wrapping your head around them, just point in a direction. that is a vector. point in another direction. that's another vector. it's literally just a way to decribe a direction in 2d or 3d space! so when i mention something is a vector, i'm talking about the direction it's pointing in
in all the examples here, we are almost always going to be working with normalized vectors. this means they are always going to have a length of one, since we usually dont care about anything but which way the vector is pointing. it makes a lot of the fancy math a lot more intuitive because you never have to deal with vectors longer or shorter than 1 unit long. assume any time i am talking about a vector, it has been normalized
dot product
the dot product is probably the most used operation when it comes to shader math, because it is essentially how you get the relationship between two directions. it is also probably something you can really quickly wrap your head around!! since we're working with normalized vectors, it makes the dot product really intuitive
here are two vectors. you can imagine these as whatever you want, say the one on the left is the direction a wall is facing, and the one on the right is the direction towards a light. try spinning the right arrow around to see how the dot product changes
dot (
,
) =
1
1
as you can (hopefully, im not great at css) tell, the dot product is 1 when the two vectors are the same direction. the dot product is 0 when the two vectors are perpendicular. and the dot product is -1 when they are facing eachother
basic diffuse lighting
if you take the dot product of the normal direction, and the light direction, you get a number that gets higher when the object is pointing towards the light, and a number that gets lower the further away from the light its pointing. it's the same effect as the color change in the simulation above, but applied to each pixel* on the mesh. that's all you need to do some basic lighting! here's what it looks like right out of the box:
dot( Light Direction, Normal Direction )
basic specular lighting
for specular, we use another common vector math operation, reflect. it does about what you'd expect - you take one vector, and then reflect it off of a surface normal (another vector), and it spits out what the reflection would be as a third vector. try it out! imagine the vector in the middle is a mirror on the floor that you're bouncing the vector on the left off of
reflect (
,
) =
we can then take the dot product of the reflection vector, and the view direction, which gives us our simple specular. the reason this works is we are basically asking, "how much light is bouncing off of the object (our reflection vector) and hitting our eyes (the view direction)". and the dot product is what tells us how similar these two directions are to eachother. here's what it looks like:
Reflection Vector = reflect( -Light Direction, Normal )
pow( dot( Reflection Vector, View Direction ), Shininess )
two things to note here:
- we need to use the negative light direction, since that would be the actual direction the light is shining, rather than the direction from the object to the light
- we raise the final value to a power, called "Shininess" here, to control how intense the specular is. im using a value of 5, but you can use whatever you want. you'll get different results by messing around with it
finally, the diffuse combined with the specular is what's known as the Phong Reflection Model. you also add on a solid ambient color, to emulate the lighting you'd be getting from the environment around the object
Ambient + (Material Color * Diffuse) +
 (Light Color * (Specular ^ Shininess) )
blinn-phong lighting
i can't really talk about phong lighting without talking about blinn-phong lighting, so, here i am! really it's just another way of calculating specular that's a bit more performant, and has slightly different visual results
instead of using reflect, we just add the view direction to the light direction together, and then normalize the new vector. this is the halfway vector between the two. then, our new specular value is the dot product of that and the normal direction
Specular = dot( normalize( View Direction + Light Direction), Normal Direction )
here you can swap between blinn-phong and phong. you can also see what it's like without any specular. i tried to get it working with the gifs but its just really hard to get the gifs to sync up

also to note: the phong Shininess value here is 5, while the blinn-phong Shininess value is 20. the differences between the two are subtle, so it's going to be your call which to use. these are just approximations of how light behaves, after all. though like i said blinn-phong will be slightly more performant
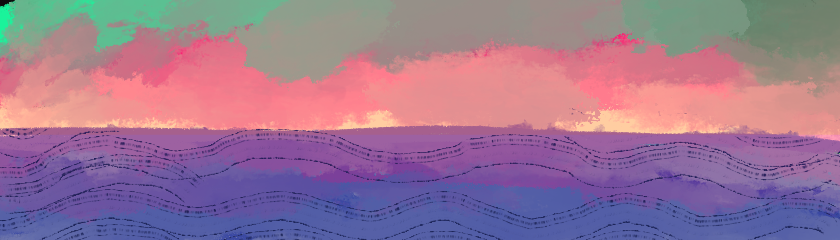
environment reflection
specular is great for making things look shiny but reflecting the actual environment around an object can really sell it. if you reflect the view direction off the normal direction, you get the direction in the environment that points to where the reflected light comes from. then all we need to do is sample an environment texture at that point! it's very straightforward
different programs have different ways of handling environment textures, but you can usually think of them the same way you think of a skybox - just a big textured sphere where no matter where you look, you're going to be seeing part of the texture. a lot of programs handle them as cube maps, but no matter the name the basic concept is going to be the same. here's an example:
sampleCube( Cubemap, reflect( - View Direction, Normal Direction )
the effect is pretty versatile and very sensistive to changes in what you pick for the texture and how the object is shaped. here's some more examples using some more abstract environment maps. each pair is using the exact same material, to give an idea of how the effect changes when you have flat vs curved surfaces
rim lighting
rim lighting, also called fresnel, is really simple. you just take the dot product of the normal direction and the view direction. this gives you a value thats higher when an object is facing you, and lower when its facing away from you. inverting that, you have exactly what you need to make the edges of any object glow for a nice rim lighting effect
pow( 1 - dot( View Direction, Normal Direction ) , Power)
we also make sure to raise our rim value to a power - the higher it is, the more concentrated towards the rim the lighting will be
sparkles
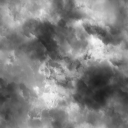
would not make sense for me to make this page and not have a section about how i do sparkles, so even though it's not a "common shader technique" i'm putting it in here anyways. there's a lot of different techniques for doing sparkly shaders, the one i use most often isn't physically accurate but it looks sparkly and that's all i need. let's take a completely random colored noise texture
every digital color is made up of a red, a green, and a blue value, from 0 to 1. now if instead of imagining them as colors, we imagined them as vectors, we basically have a texture where each pixel is a random direction! since right now all the colors are from 0 and 1, we have to make sure to subtract each color by 0.5, so that we get some pointing in negative directions as well
then, if we take the dot product of the view direction and the random direction from the noise texture (making sure to normalize it!!), we get a bunch of values that randomly increase and decrease whenever you view them from different angles. that's sparkles !!!
Random Direction = texture( NoiseTexture , uv).rgb - 0.5
Random Direction = normalize( Random Direction )
Sparkle = pow( dot( - View Direction , normalize( Random Direction + Normal )) , Power )
to note -
- i add the normal direction to the random direction, so that the sparkles also sparkle when the object turns around. this is not physically accurate but it works! it's similar to the halfway vector we take in blinn-phong lighting, but not quite the same
- we make sure to take the sparkle value to a power. the higher this value is, the more concentrated the sparkles will be when the directions line up
- if the value of the sparkles goes higher than 1, we can use that to make them glow with post-processing effects like bloom (as shown in the gif)
- depending on the texture you're using, you might need to turn off compression on the texture, or the sparkles will all blend together
- again, this isn't physically accurate!! there are many ways to do sparkles, this is just my method of choice
and here's one extra gif

iridescence
you can pretty easily get a convincing iridescence effect by playing around with environment reflections. sometimes though, you might want something more physically accurate. for that i deffer you to the wonderful tutorials by alan zucconi. they're my go-to resource whenever i need to make an iridescent effect
here is a diffraction grating effect, covered in alan's tutorials. i've tweaked the tangent directions a bit, and added a normal map, giving it that grainy effect
stencil buffer
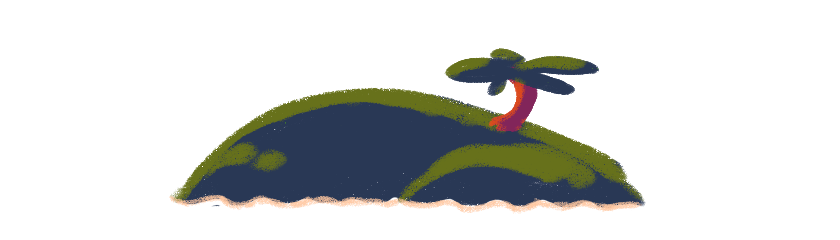
the stencil buffer is essentially a way to mark specific objects to only be rendered when behind other specific objects. its a texture that gets rendered in the background that you generally don't see, but you can read from and write to. it is the smoke and mirrors behind a lot of "impossible geometry" effects, like so:
taking a peek at the actual scene geometry, we see the portal and the incredibly-densely-polygoned pikachu exist in 3d space, but we can only see them through the window
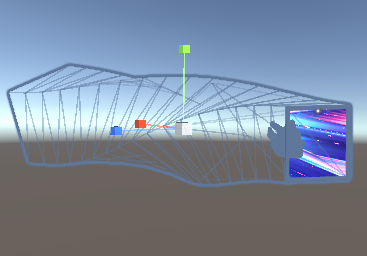
the way this works is all our objects that we want "hidden" are given an arbitrary stencil value, in this case 1. then, we have it only visible when the stencil buffer is already set to 1. the stencil buffer is zero by default, so we end up not drawing anything. but if we have another object that always draws a value of "1" to the stencil buffer, then the first objects will get drawn, but only when they are "viewed" through the second object
play around with this if you'd like: imagine the circle is writing a value of "1" to the stencil buffer, and the island is only visible when the stencil buffer is equal to "1"
parallax
the actual math behind parallax in shaders is a bit complex because we start to get into matrix math territory. conceptually though, it isn't too difficult. i'm going to show the cool shapes first and then get into the breakdown this time, to try and give you the strength to proceed. i even added a tiny bit of rim light to them too, for extra motivation
we are essentially "faking" depth with a 2d texture, and just getting a bit clever with how we display the texture itself. you can see it the best in the cube on the right. there's a ton of useful applications of parallax mapping, but i like to use it to make pretty rocks, so that's what i'm going to be talking about. for the actual main uses of parallax mapping, check out catlike coding's excellent tutorial on it
but lets try and break it down a bit. you probably already instinctively know what parallax is as a concept. objects closer to you move faster, and objects further from you move slower. if my css isn't broken you can literally see it for yourself on the sides of this page when you scroll up and down. but i dont want to make you do physical labor so here:


parallax! things closer move faster, things further move slower. now lets switch gears a little bit. i want you to imagine a window, and in the of the window, there's a ball, but its a little bit pushed back so it's outside the window. like so:

now try moving the windows back and forth, paying attention to how the ball moves:

now this makes sense in 3d space. but what if it was just a 2d texture? what happens to the ball when the window moves left? how about right?
if you are just focusing on how the ball moves in relation to the window, you should be able to tell that the ball looks like it's moving opposite whatever direction you're moving the window in. and not only that, but it's moving towards the center of the screen. we can obviously fake this effect in 2 dimensions, since unless there's something i don't know, you're reading this on a 2-dimensional screen. so all we need is a way to find out the direction we need to move the 2d texture to make it look 3d
in this example it's easy. when the window moves left, move the ball texture right! and when the window moves right, move the ball texture left! but how about more complex shapes? how about when you turn the window 45 degrees? well good news - theres actually a consistent way to find this by finding the tangent-space view direction
the actual math involved in finding it is a bit out of the scope of this page. if you want to learn more, i once again defer you to catlike coding's tutorial. what it essentially boils down to, though, is finding the view direction in tangent space, or, "what direction is the camera in in relation to the surface of our mesh? (and in this case the texture)". then, we can push the texture in that direction.
that's all you need to make your 2d texture look like it has depth. let's take these two textures.
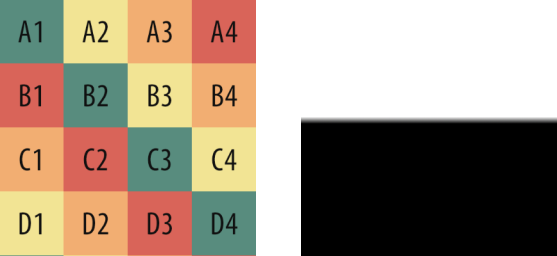
what would happen if we used the tangent view direction to move the texture on the left, multiplying the distance by the texture on the right?
the lower half of the cube has no depth to it, since the texture on the right is black, which gives it a depth of 0. but the upper half of the cube looks 3d! it has a depth of 1 and it's moving how you would expect it to move if there was a 3d inside of the cube, but it's being completely faked on the surface of the cube just by adding the tangent-space view direction to the texture coordinates. it's all just 2d textures being pushed around so they move towards you, the viewer.
ok. last thought experiment. we used just a 50% black 50% white texture for depth, splitting the cube down the middle, the lower half having no parallax, and the upper half having all parallax. what if we used a noise texture for both instead?
instead of having a sharp cutoff between parallax and no parallax, we would have smooth transitions between parts of the texture that are close to the surface, and parts of the texture that have "depth". and since we're using the same texture for the color, it's like the dark parts of the texture get raised, and the light parts get lowered. it would look like this!!
parallaxOffset = texture( DepthTexture, uv ).r

            parallaxOffset = parallaxOffset * TangentViewDirection.xy

            parallaxOffset = parallaxOffset * -1 * _Depth

            color = texture( DepthTexture, uv + parallaxOffset )
and thats how i use parallax to make cool rocks!! a few caveats, as you can tell there's some distortion, and thats just a natural artifact that comes about from trying to push around a 2d texture to make it look 3d. works for me because i make crystals, might not work for you. if you want to learn how to get rid of it, or a bunch of other things, you guessed it, catlike coding. and if you Really want to see the code for the tangent-space view direction i hid it under here so i dont scare people with making this section even longer. but because it's hidden im going to be rambling a lot more just a warning.i should not be the one to explain matrix math to you. last warning
ok so you want to learn about matrix math. we need to turn something from one space to another space (so in our case from object space to tangent space, because we have the view direction in object space, but want it in tangent space). object space is basically where something is in relation to our object, while tangent space is where something is in relation to the surface of the mesh. but not the normal thats pointing away from the surface, while the tangent is pointing along the surface
i. will not be explaining how to build any 3x3 matrix but what you need to know is to turn anything from one space to another, you just build a matrix to do it. litreally thats what matrixes are for in shader math its for moving coordinates from one context to another context. in our case to build the ObjectToTangent matrix we do:
Tangent (x, y, z)
Bitangent (x, y, z)
Normal (x, y, z)
that's our 3x3 object-to-tangent matrix. and then you literally just do
TangentViewDirection = 3x3Matrix * View Directionto turn the view direction into tangent space. deceptively simple. please note the view direction here isn't in world space, which is what we usually use the view direction in, but in object space
easy way to think about the difference between being in object space and being in world space: lets say you have a cube. and that cube is 100 units in the air. in object space, the cube is still at (0,0,0). because it is the space with respect to itself. and it itself is always going to be at (0,0,0). in world space though, the cube is at (0,100,0), because its 100 units in the air. am i making sense here. its 4am
ALSO to get the bitangent you just take the cross product of the normal and the tangent, and you multiply by the w component of the tangent to make sure its facing the proper direction. so like this
Bitangent = Cross ( Tangent.xyz, Normal.xyz) * Tangent.wso ALL TOGETHER, to get the tangent-space view direction, you do
Bitangent = Cross ( Tangent.xyz, Normal.xyz) * Tangent.w;
ObjectToTangent = (Tangent.xyz, Bitangent.xyz, Normal.xyz);


TangentViewDirection = ObjectToTangent * ObjectViewDirection;


Normalize (TangentViewDirection);


TangentViewDirection.xy /= (TangentViewDirection + 0.42);
"why did you add 0.42 at the end there" https://catlikecoding.com/unity/tutorials/rendering/part-20/
that's it for now!! again, if you have any questions or if you've caught any mistakes feel free to shoot me a message on my bluesky or comment below